StickerFace: A Toolkit for Sprite-Based Facial Animation
Presentation
StickerFace is an opensource project providing users with the set of scripts and plugins needed to rig, animate, and render cartoon-inspired facial expressions with Maya and VRay.
Built with earlier versions of Autodesk Maya in mind, StickerFace heavily relies on the hardware acceleration made achievable by Maya's Viewport 2.0, and achieves better performances
than earlier implementations of Maya's native projection nodes.
StickerFace's core features are its CGFX shaders used to provide animators with previews of the final facial expressions at real-time rates.
But besides these GPU-enhanced materials, StickerFace also comes with scripts facilitating their use at all the relevant steps of the production process :
-
The auto-rigging procedure allows users to straightforwardly apply those shaders to any geometry, configure its behavior at the animation stage, and create a fully functional controller hierarchy.
-
The controller picker greatly speeds up the animation process by displaying all sprites available per facial feature and providing tools to globally edit expressions.
-
Finally, we implemented tailored VRay nodes that guarantee the exact reproduction at the rendering stage of the facial expressions designed by animators, and scripted the construction of the necessary shading network.
Each aforementioned script or tool is presented to users via an intuitive GUI that can be invoked through Maya shelves for quicker access.
Content
Developed at SUPAMONKS STUDIOS, StickerFace's source code has since been released as an opensource project under the LGPL3 license.
The StickerFace Git repository is available here.
The repository stores the entirety of the source code needed to build and manipulate all the entities required by the facial animation workflow, from auto-rigging scripts to dedicated VRay nodes used during rendering. Its folder structure splits into two distinct hierarchies:
-
The maya subfolder stores the Python source code responsible for the auto-rigging system, picker, and the construction of the shading network after animation baking.
-
The vray subfolder contains the C++ implementation of our custom textures as a VRay plugin.
Supported Versions
-
As previously stated, StickerFace is mostly intended as a replacement for earlier implementations of Maya's projection nodes. It has been tested with Maya 2015 and Maya 2018.
-
At the time of writing, the VRay plugin has only be tested on Windows x64 platforms, and built with Visual Studio 2012. The version of the VRay App SDK used is 3.25.01 (
VRAY_DLL_VERSION = 0x32501).
Installing the Maya Tools
Once cloned or downloaded from the Git repository, StickerFace's Maya tools only requires a few additional installation steps:
-
Your local version of the project's Maya plugin folder must appear in your
MAYA_PLUG_IN_PATH environment variable.
-
The StickerFace's toolbox can be installed by a simple drag-and-drop of the
stickerface_install.mel script file onto a running Maya.
Building the VRay Plugin
Building the VRay plugin is slightly more involving, and in its current state, compiling its source code has a couple of requirements:
- Visual Studio 2012 is required to produce the VRay plugin's binary.
- Two external dependencies are also needed to build the plugin:
- The build system relies on Premake5 and prior its invocation, the paths to the two externals dependencies must be filled in the
path.lua file (by setting the EIGEN_ROOT and VRAY_SDK_ROOT variables).
The Visual Studio solution used to compile the VRay plugin is generated by running the following command:
premake5.exe vs2012
Finally, the path to your compiled binary vray_stickerface.dll must appear in the environment variable used by VRay when searching for plugins to load (VRAY_FOR_MAYA2015_PLUGINS_x64 when working with Maya 2015 for instance).
Emoting with StickerFace
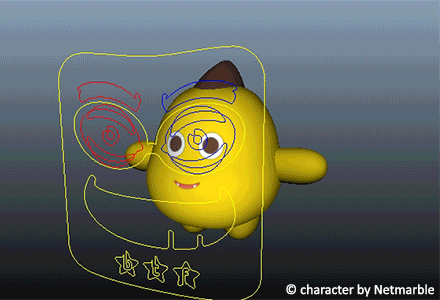
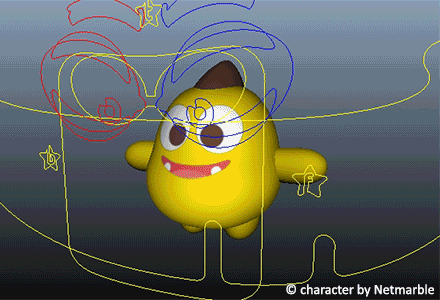
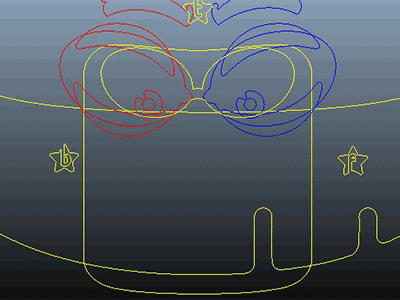
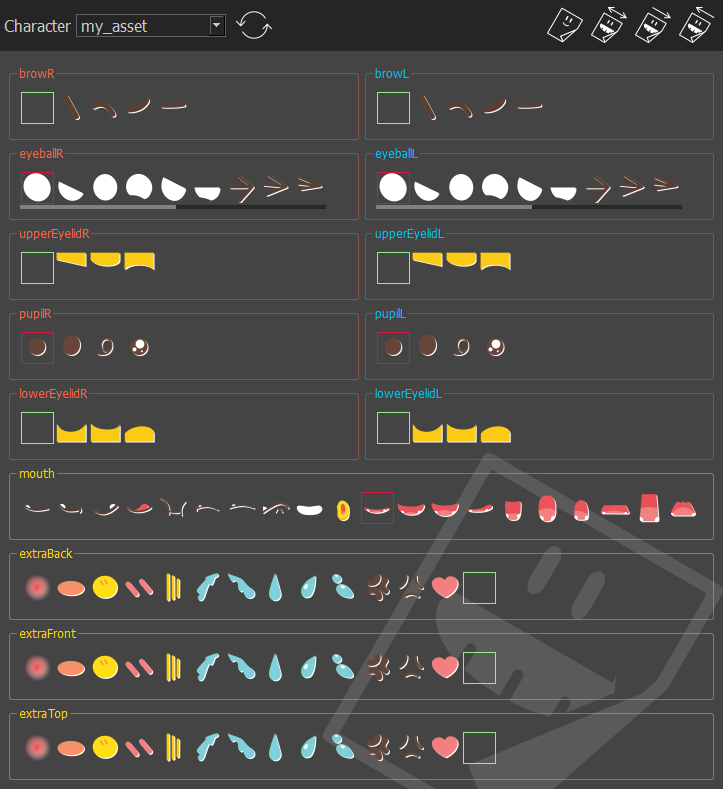
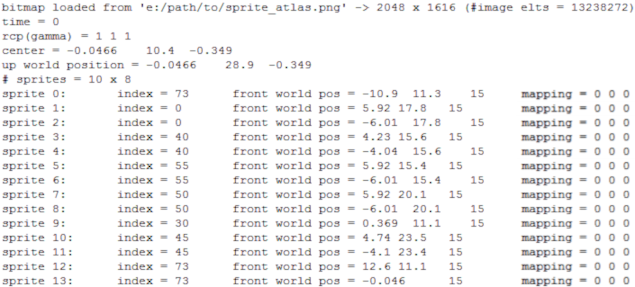
A face created with StickerFace consists in the collection of texture sprites whose layering and projection are executed by a CGFX material. All facial features are then represented by sprites drawn from a common sprite atlas. An atlas is an image file made of the juxtaposition of all possible sprites, aligned in a regular grid layout.
At a given time, the controller of each facial feature supplies the index of the sprite to be displayed. For easier use, it is possible to assign a different validity range and default value to each facial feature.
A face is made up of eleven facial features and three extra sprites that can be used to create richer expressions. It should be noted that, beside layer ordering, some sprites can only appear through others: Pupil and eyelid sprites are expected to lie inside the sprites dedicated to eyeballs and will be cropped otherwise.
Above lies an image showing the controllers associated with the different facial features, as well as the identifiers the StickerFace system uses to refer to them.
Facial Autorig
Using StickerFace to adorn a shape with a facial rig is a two-fold process:
- Run the StickerFace autorig process and feed the GUI wizard with the information it expects (such as the face geometry, the projection type, the paths to the generated shader and input textures, and the general sprite layout information). The CGXF material, the controller hierarchy, as well as the DG network connecting the two will automatically be created.
- Riggers can then manually finetune sprite projections or controller placements prior animation if needed.
The StickerFace system assumes the face geometry to be z-forward facing.
Using the Wizard
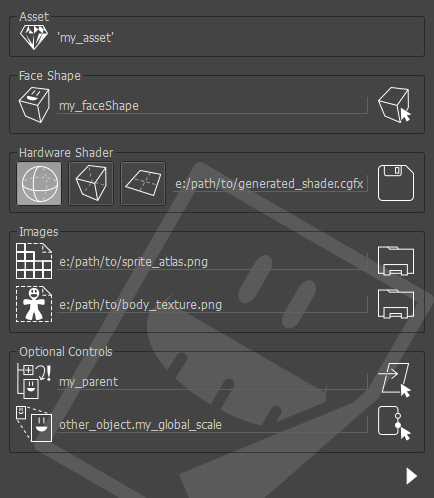
The autorig wizard is summoned by clicking the  icon on the Maya shelves. The following dialog shall appear:
This first window gathers all mandatory information for performing automatic facial rigging on a given shape, as well as a couple of optional controls. Here is the meaning behind its icons:
-
 represents the asset and should always be associated with a relevant name.
-
 stands for the shape the facial rig and sprites will be applied to. You initialize it from the selection by clicking the
  icon on the right.
-
Currently, StickerFace handles three types of geometric projections for applying the sprites onto the shape geometry. Depending on its overall shape, different projections can yield more intuitive and controllable results. You choose your desired projection by checking one of the following icons:
 for the spherical projection,
  for the cubic projection,
  for the planar projection.
Once done, you specify the path the CGFX shader must be saved to by clicking the  icon.
icon.
-
 corresponds to the sprite atlas, whose path is specified by clicking the
  icon. The sprite atlas corresponds to a file image storing all sprite disposed in a regular grid layout.
-
 designates the body texture, which is the texture that will appear below the projected sprites. Its mapping onto the surface is dictated by the texture coordinates assigned to the vertices of the geometry. Its path is specified by clicking the icon.
The lower half of the dialog is reserved for optional controls over the generated facial rig:
-
 represents the source object of an optional parent constraint targeting the generated rig's root transform. It can be initialized from the selection by clicking the
  icon on the right. By default, a parent constraint involving the face shape's transform is created.
-
 indicates which external attribute will serve as a dynamic global scaling factor on all of the sprite projections. By default, no such connection is created, but users can specify any scalar attribute from the selection for that purpose by clicking the
  icon and picking one of its eligible attributes.
For the system to work in its entirety, you must name your asset (by giving your Maya scene a filename). This name is especially important for the StickerFace workflow to keep on correctly identifying your face geometries once your animation has been baked.
Once users have provided the required information, clicking the  icon on the bottom right corner brings the following dialog if a valid sprite atlas has been located:
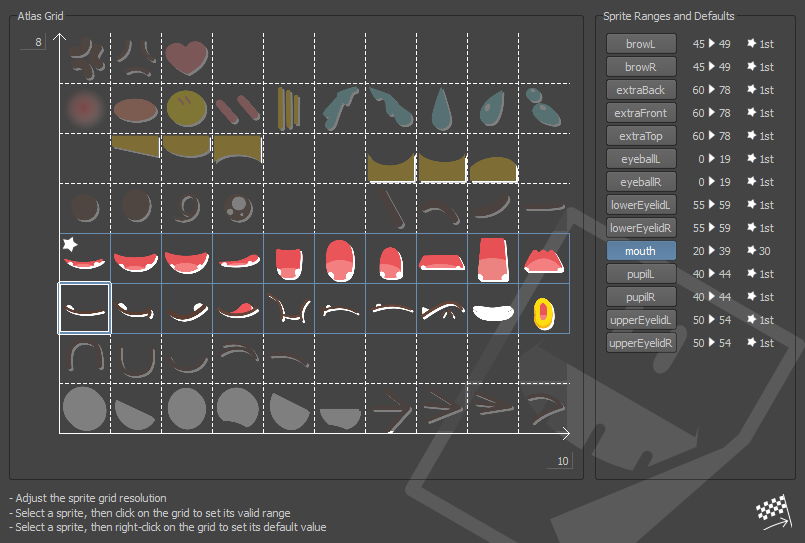
This step is optional and skippable, but it greatly facilitates the specification of the information required for the sprite atlas to be correctly handled by the StickerFace system. It provides visual support for the specification of the following:
-
The resolution of the atlas grid
The number of columns and rows of the grid sustaining the sprite atlas should be properly set. The resulting grid layout is shown with white dashed lines.
-
The range for each facial feature
Users can restrict the range of sprite indices each facial feature can accept: by checking one of the available feature buttons displayed on the right, and left-clicking the desired first and last sprite locations on the atlas grid displayed on the left. The range of the currently selected feature is highlighted with light blue outlines.
-
The default sprite for each facial feature
The default index value for each facial feature is specified by right-clicking the corresponding sprite location on the atlas grid. It is then decorated with the  symbol.
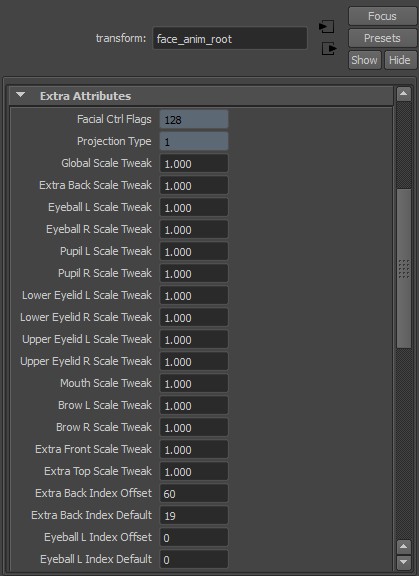
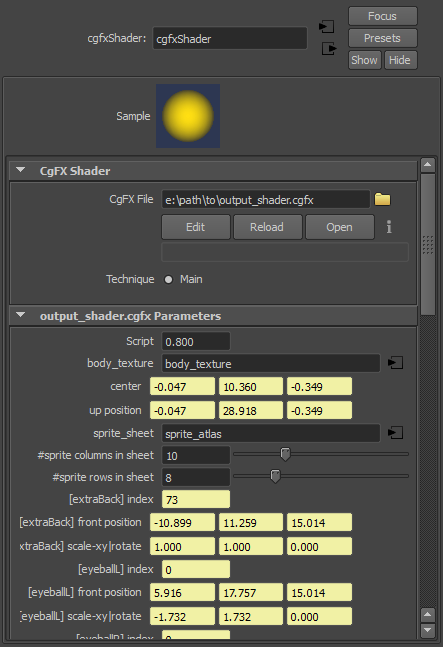
Since the previous step is optional, all the information it sets can be subsequently modified if needed, either by editing the values of the attributes attached to the face_anim_root controller (index ranges and default values, as well as scaling factors) or the generated material itself (atlas grid resolution):
Finally, clicking the  icon on the right bottom corner triggers the generation of the facial rig.
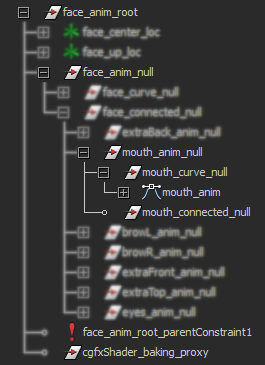
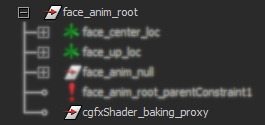
Worth noticing from the DAG object hierarchy output by the autorig procedure are:
- the root group,
face_anim_root, targeted by a parent constraint and storing many extra attributes relevant to riggers,
- the hierarchy of transforms starting at the
face_anim_null group, inside of which the controller shapes live,
- a proxy object used for animation baking.
The transform hierarchy contains different categories of subgroups, each with its specific purpose:
- the
*_anim transforms are reserved for animating the sprites' projections,
- the
*_anim_null groups are used to adjust the sprites' projections onto the face shape prior animation in order to create a proper neutral expression,
- the
*_curve_null groups enable the repositioning of the controllers' shapes without altering the sprites' projections,
- the
*_connected_null groups are used internally by the system and are not supposed to be edited.
Tweaking the Rig
Once the wizard has been successfully run, a dedicated material has been assigned to the face geometry, animation controllers have been generated, connected to its attributes, and placed within a specific hierarchy of transforms (as well as in a separate selection set). The facial rig should be functional, but it is most likely that manual adjustments will be needed for it to be usable at the animation stage.
For better efficiency, editing the facial rig should follow a specific workflow:
-
Place the overall controller hierarchy at a decent distance to the face geometry by translating the face_anim_null group along the z-axis.
This step should be done as early as possible since some projections depend on the distance of the controllers to the geometry (i.e. spherical projections). In such instances, moving the controller hierarchy around later on is likely to force users to redo the manual tweaking of the controllers.
-
Calibrate the sprites' projections on the face by adjusting the *_anim_null groups' translation and scaling values.
-
Only after you obtained a proper neutral facial expression, can you adjust the controllers' positions independently of the sprites' projections, by tweaking the *_curve_anim groups' transforms.
At the end of the facial rigging process, no *_anim controllers should have a transform value differing from the identity.
Picker for Animation
Each facial feature is associated with a controller. Its world position dictates where its corresponding sprite projects onto the face geometry, and one of its extra attribute stores the index that determines which sprite from the atlas should be displayed.
While keyframing the controllers' sprite indices could be done via Maya's attribute editor, the animation process can be made much smoother by using the sprite picker that can be invoked by clicking the  icon from the Maya shelves.
For a given asset, the sprite picker straightforwardly lays out thumbnails corresponding to the sprites each of the asset's facial feature can display.
-
Clicking a thumbnail changes its corresponding controller's sprite index and effectively alters the facial expression. Currently displayed sprites are highlighted by brightly colored squares, with red squares indicating that a key has been set at the current frame.
-
When a facial feature can be represented by many sprites, holding ALT and the mouse's middle button enables horizontal scrolling through its thumbnail gallery.
-
A single mouse click inside the area dedicated to a specific animation controller selects it.
-
When a scene includes multiple assets with a StickerFace rig, users can have the picker switch between them via the
 asset choicer. Asset detection is triggered by clicking the
  icon.
icon.
Scripts are also available to speed up some of the most frequent face edits:
-
 brings the asset's face back to its default configuration.
-
 mirrors the asset's facial expression.
-
 and
and  symmetrize the asset's facial expression.
Baking the Animation
Beside the controller hierarchy, running the StickerFace autorig triggers the creation of a proxy object.
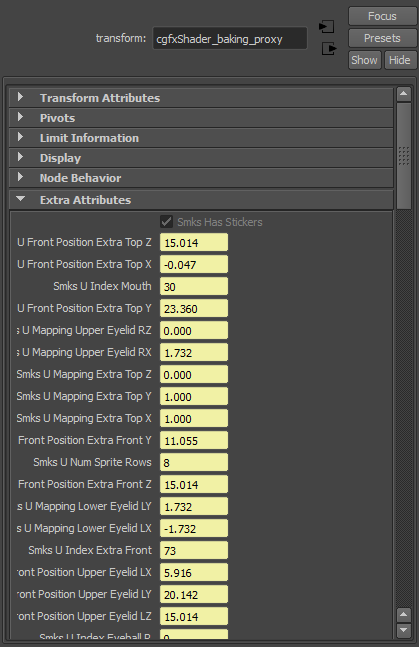
This object is used as a bridge between the animation scene and the lighting scene. Each asset is associated with its own proxy object. This proxy object stores the animation curves of all the facial features' controllers as extra attributes, as well as the information mandatory for the later stages of the StickerFace system to work.
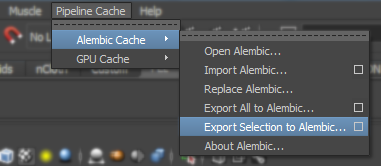
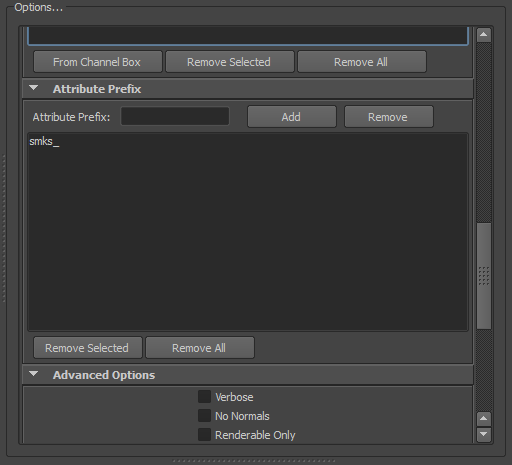
All the names of the proxy's attributes start with the smks_ prefix. This prefix is used when baking the animation scene in an Alembic file to filter out irrelevant attributes.
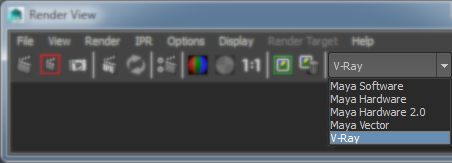
Rendering with VRay
For rendering animated facial expressions from baked scenes, one must make sure the proxy objects of all involved assets, as well as all their extra attributes, have been properly saved in the Alembic file.
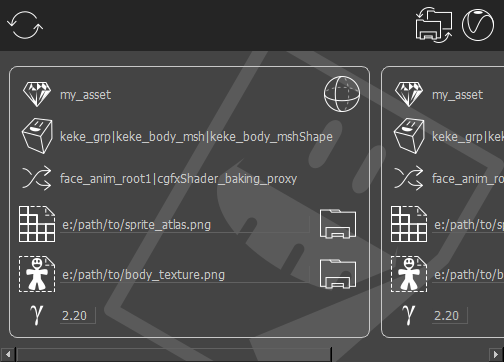
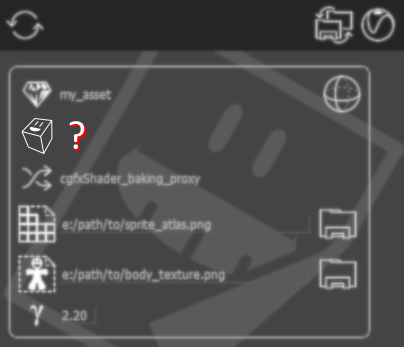
After importing their Alembic archives to a new Maya scene, users simply need to run the last wizard from the StickerFace toolbox that is accessible by clicking on the  icon on the shelf. Upon invocation, it will attempt to locate as many proxy objects as possible in the scene, and interpret all the available information related to them. The wizard will display its findings via proxy cards as follows:
Among the recognized pieces of information are:
-
the asset's unique name
-
the type of geometric projection used by the facial rig , , or
-
the face shape's name
-
the proxy object's name

-
the sprite atlas's path used during animation
-
the body texture's path used during animation
Users can manually trigger the proxy object detection by clicking the icon.
Color Correction
Applying gamma correction to input textures is usually necessary prior rendering. The wizard proposes to facilitate this process by automatically adding a gammaCorrect Maya node inside the shading network it generates. Its initial value can be directly set via the wizard in the text field next to the  icon.
icon.
Since the VRay plugins responsible for rendering the facial expressions handle the loading of the sprite atlas themselves, they also expose a set of special attributes to perform gamma correction. In order to maintain the correction values applied to the body texture and the atlas consistent, it is strongly recommended to edit the values from the gammaCorrect Maya node generated by the wizard.
Changing Resources
When using different sets of textures between the animation and rendering stages (e.g. different resolutions), the rendering wizard allows users to change paths for both the sprite atlas and the body texture. This can be done on an individual basis by clicking the icons beside all paths, or by globally remapping resource path hierarchies by clicking the  icon.
icon.
Clicking the icon brings the following dialog that users can use to globally swap between file hierarchy roots:
-
 represents the source folder whose path will be replaced in all texture filepaths. It is set by clicking the icon.
-
 stands for the destination folder whose path will replace instances where the source folder's path appears in the texture files. It is set by clicking the icon.
-
The resource remapping process is triggered by clicking the icon.
At the time of writing, only PNG image files can serve as sprite atlases for rendering with VRay.
Final Step
Once all proxy objects have been detected, their gamma correction values set, and the paths of their resource textures possibly updated, users can click the  icon to generate the shading network needed to render the StickerFace expressions with VRay.
Upon execution, the shading network generating script loads the vrayformaya plugin, along with all the VRay plugins the system can find in the process. For that reason, first executions can appear suspiciously slow.
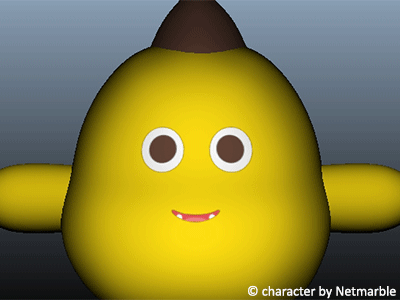
Below is an example of a character rendered with StickerFace expressions using the VRay renderer:
Troubleshooting
Lost Face Shape?
As previously mentioned, the asset name is a crucial information that must be preserved throughout the entire process. It is used to uniquely identify and bring together entities that must work together.
The following screenshot showcases an occurence of an undetected shape at the rendering step due to mismatching or missing asset name information:
In such cases, users must check the correctness of the asset name information seen by the system. It is attached as an extra attribute to the following objects:
-
on the shape itself,
-
on the
face_anim_root group at the top of the controller hierarchy,
-
on the proxy object.
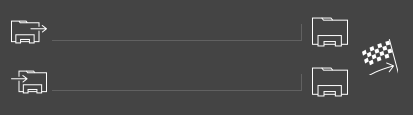
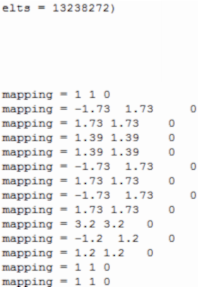
No Rendered Sprites?
Passing keyed attributes to VRay plugins appears to be a fragile process.
The facial attributes (individual sprites' indices and transforms), as well as their animation curves, are stored as extra attributes attached to the proxy object created by the autorig. These are the inputs used by the VRay textures, and the StickerFace solution expects you to run its VRay wizard in a scene importing the baked animation stored in an Alembic file.
When directly generated in the animation scene, the shading network may encounter updating issues. Such instances can be detected by examining the Maya output window that displays the attribute values effectively used by the VRay renderer.
Follow illustrations of incorrectly initialized sprite mapping values (on the left) and properly updated values (on the right):